To set up a second or additional Wightman email account, call our Customer Care Centre at 1-888-477-2177.
Logging in to Wightman Webmail:
- Using a web browser like Internet Explorer, Microsfot Edge, Google Chrome, or Firefox, go to https://webmail.wightman.ca.
- You will be asked for a username and password. The user name will the first part of your email address, before the @ symbol; so if you’re email account is [email protected], your username is johnsmith. Your password will be your usual email password; if it is not working or you do not know it, please call Technical Support at 1-888-477-2177.
Receiving Email:
- Once you have logged into web mail, you will be automatically taken to the Inbox, which will show new messages. Unread messages will be in bold. You can open a message by double left clicking on it. You can go back to the Inbox from reading a message by either clicking Inbox on the left hand side, or pressing the back button near the top left corner, next to Compose.
- Emails may be downloaded by computers or other devices if they are configured with POP3; if so, they may not show up in your Inbox.
Sending Email:
- To send an email, click the Compose button near the top left corner; it will appear as a piece of paper with a pencil over it. This will open a new screen.
- In the To field, enter the email account or accounts you wish to send a message from. Contacts saved in programs (ie Outlook or Windows Live Mail) will not be available.
- Enter the Subject Line and the main body of the email as normal.
- To send the email, click the icon across the top of a gray box with an envelope going into it, or click Send Message near the bottom left of the screen.
Every day, we receive reports of email scams. While email is a tool used by thousands of legitimate businesses, there are also thousands of fraudsters who use it to steal money, goods, and information from honest people.
The best ways to avoid becoming a victim of email fraud are:
- DON’T open the email or any attached files
- DON’T respond to the sender
- DON’T send money or personal information, even if it looks official or sounds urgent
- DO verify the sender and/or request is legitimate by calling the business or individual sending the email. Be sure to use a published phone number, and not any numbers listed in the email.
- DO report the email to the Canadian Anti-Fraud Centre
- DO contact police if you have been defrauded or suffered loss.
For information on email scams, computer viruses, and other fraudulent activity that Wightman is aware of, click here.
For more general information on email fraud, visit the Canadian Anti-Fraud Centre email scams page and check out this article.
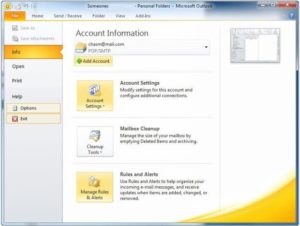
1. Click on File, then Info, then Account Settings, and Account Settings.
2. Click New in the top-left corner.
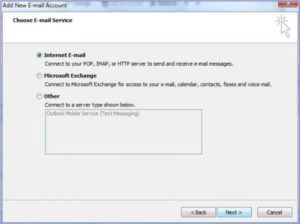
3. On the Choose Email Service page, select Internet E-mail. Click Next.

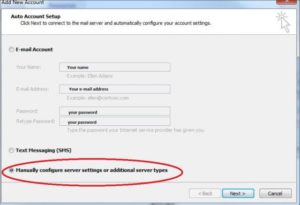
4. Click to select the Manually configure server settings check box, then click Next.
5. Select Internet Email and click Next.
6. Fill in the boxes in the Internet E-mail Settings dialog box. Make sure that the Account Type setting is set to POP3.
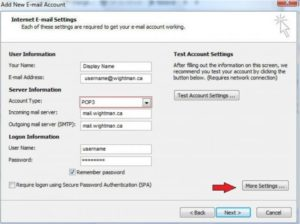
- Fill in your name, full e-mail address & password.
- “Your Name” is the name shown to the receivers of your emails.
- “E-mail Address” is your full Wightman email address.
- “Account Type” must be POP3.
- “Incoming mail server” is mail.wightman.ca
- “Outgoing mail server (SMTP)” is also mail.wightman.ca
- “Username” is the part of your Wightman email address that is before the @ ie: [email protected]
- “Password” is the password you set up with a Wightman Customer Care rep when your email address was created.
- Then click on More Settings.
7. Click on the Outgoing Server tab.
8. Ensure there is a check mark in – “My server requires authentication & use same as my incoming server”.
9. Go to the Advanced tab.
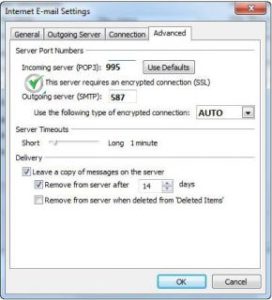
– Ensure the Incoming server (POP3) port is “995”. Ensure that the check mark is on – “The server requires authentication”.
10. Click OK.
11. Click Next, follow the prompts to finish setting up your account, Click Next.Click Finish.
To set up an ‘Out of Office’ auto-reply email follow these steps:
- Login to your Wightman Webmail account here
- Click on Settings in the top-right corner
- Click on the Vacation/Forward Tab
- Check ‘Send a Notification’
- Enter a subject and a message
- If forwarding, make sure ‘Keep a Copy’ is checked, and enter the forwarding address(es)
- Click ‘Save’ at the the bottom of the screen
Remember to remove your ‘Out of Office’ reply when you get back.