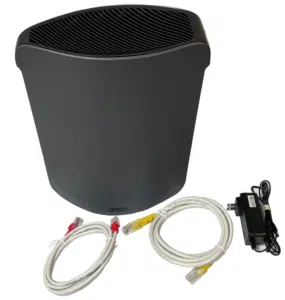
Remove your Adtran 834-5 Dual Band Router from the box. You should have:
- Router
- Power Adapter
- Ethernet Cables
Connecting the Cables:
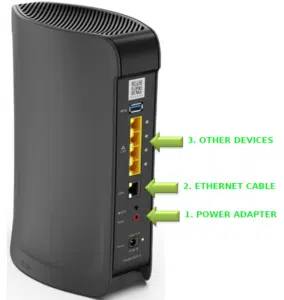
- Plug the power adapter into the back of the Adtran router and also into an electrical outlet. You should see a Power light.
- Plug the white/red Ethernet cable into the port on the Adtran router labelled WAN. The other end of this cable should go to an ethernet jack in the wall or directly to ETH 1 on the Fibre Optic modem. Typically, this modem will be mounted on a wall.
- Wired devices can be connected using an additional Ethernet cable plugged in to any one of the yellow LAN ports on the Adtran router unless the Adtran router is also being used for TV services.
If TV service is also configured on this router, use LAN Port 1 only for devices.
SmartRG Control Panel login here.
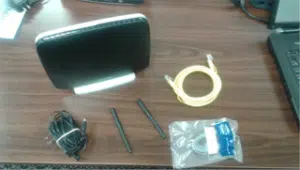
- Remove your SmartRG from the box. You should have;
- 1 Router
- 1 Power Adapter
- 1 Ethernet Cable
- 1 Phone Cable
- 2 Antennas
- Take each antenna and screw it onto the back of the router.
- Plug the power adapter into the back of the SmartRG router and also into an electrical outlet.
- Ensure the on/off button on the side of the SmartRG router is pushed in. You should see a Power light.
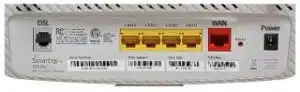
- If on a DSL connection – Plug the grey telephone line into the grey port on the SmartRG labelled DSL. Plug the other end of the grey telephone line into the phone jack used for internet. The DSL light should go solid within a few minutes.
- If on a Fibre to the Home connection – Plug the white Ethernet cable into the red port on the SmartRG router labelled WAN. The WAN light should go solid within a few minutes.
- Wired devices can be connected using an Ethernet cable plugged in to any one of the yellow LAN ports on the SmartRG router unless the SmartRG router is also being used for TV services
In Mail Voicemail Administration Guide
Programming Manual
Features and Specifications Manual
IP Multi-Line Terminal User Guide
Digital Telephone Quick Reference Sheet
InMail Quick Reference Sheet
Single Line Telephone User Guide
Features and Specifications Manual
Digital Telephone Quick Reference Sheet
Multi-Line Terminal User Guide
Single-Line Telephone User Guide
PC Programming Guide
InMail Feature Manual
Hacker Defence on the NEC SL1100 System
NEC Digital System
Like all other phone systems or network connected devices, the NEC SL1100 can be a potential target for hackers. These SIP hackers typically attempt to register VOIP ports to make outbound calls, as well as manipulate some of the voicemail options such as External Notification or Find Me, Follow Me to international numbers of their choice. Some of the most common hacker defence options are:
- Adding toll restrictions on all extensions
- Blocking international calling on lines at the supplier level
- Changing the default values for the system password and IP
- Eliminating voicemail boxes that are not in use and having users make their voicemail box passwords secure using a code other that 1234, 0000, etc.
- Changing the installer level password in in Program 90-02.
Here are more additional ways to defend your SL1100 from being hacked:
- The NEC SL1100 should be installed behind a firewall and all relative ports should be blocked from outside access. To ensure security, the following ports should also be blocked from outside access:
- Port 80 (http) for the WebPro Port
- Port 8000 for the PCPro Port
- Port 5963 for the DIMM Port
- Only Ports that are needed should be port forwarded to the SL1100. Do not put the SL1100 phone system in the router/firewalls DMZ as this will allow the phone system to be visible to anyone running a port scan over the internet. Some of the ports that the SL1100 uses are:
- 5080 – Register port for NEC Proprietary SIP Phones (This is the port that is used to connect an IP Phone over NAT)
- 5070 – Register Port for 3rd party SIP (This is the port used to connect a Mobility Client, VOIP Polycom or an X-Lite Softphone)
- 5060 – Default Proxy/Registrar Port for SIP Server (This is typically used for connecting SIP Trunks)
- All User Names and Passwords should be changed for maximum security in Program 90-02. User Names should be set to 10 characters and passwords can be set for up to 8 characters.
- All physical phone extensions that are in use should have a Voicemail Access Code Setup. Press the VM softkey on each phone and press “More”, then “Setup”, then “Code”. Enter the Access Code to be stored. Each time that a user attempts to access their voicemail box this code will be needed.
- Change ports for PCPro and WebPro. If ports are going to be forwarded in the router for remote maintenance, NEC recommends changing the default, well-known port numbers for WebPro and PCPro in Programs 90-54-01 and 90-54-02. If port forwarding of WebPro’s port will be used (not recommended) then you should also go to Program 90-28 and change each extension password for UserPro (for the extensions that need access to UserPro) or delete the passwords for the extensions that do not need access to UserPro so that it may not be accessed. This will prevent hackers from being able to make changes to individual extensions such as call forwarding.
End User Guide coming soon
- Open the Windows 10 Mail program by clicking on Mail in the Start Menu.
- Click on Add Account.
- A window will pop up asking you to choose the type of account. On the right hand side, click on the scroll bar and scroll to the bottom in order to show Advanced Setup. Left click on Advanced Setup. The other options will not work correctly with Wightman email accounts.
- You can now add the account details. Start with the following:
- Email address will be your Wightman email address.
- User name is just the first part of the email address, i.e. the username for [email protected] is alan.smithee.
- The Password is the password you decided on for your email address.
- The Account Name can be anything, it’s a just a local label for the account.
- Continuing down, the incoming mail server will be mail.wightman.ca.
- For the Incoming email server you will have a choice of POP or IMAP. POP will download all mail to your computer. IMAP will leave a copy of your mail on the server so that other devices can access it.
- The Outgoing (SMTP) email server is mail.wightman.ca.
- Continuing to scroll down, you will be presented with 4 options, as shown below. Make sure they are ALL checked, then left click Sign In.
- The account should now be finished. Left click Done.
- Windows 10 Mail should now be ready. Your email will begin downloading into the Inbox.