Fibre Information: 1-877-TOFIBRE (863-4273)
FIBRE OPTICS
Fibre Information: 1-877-TOFIBRE (863-4273)
Our world is connected like never before, and the global economy is becoming more technologically advanced. Wightman is no exception. We’re connecting you and paving the road to the future with Fibre to the Home.
Like water and electricity, connectivity has become an essential utility for many homes and businesses. A fibred community enhances quality of life, providing users with unsurpassed access to Phone, Internet, and TV. Now Wightman Telecom’s revolutionary fibre optic network will enable all of your communication and entertainment services to be carried over a single strand of glass at the speed of light.
From providing outstanding customer service to giving back to our community, our deep-rooted values and commitment to our customers are the foundation of our continued growth and success.
We have Fibre to the Home available for Phone, Internet and TV Services, where available.
Pricing
We do more than just connect you to the world’s most advanced technology, we back it up with our award-winning local customer service and a local support team that’s available 24/7/365.
The future is here and the future is Fibre to the Home. Take a look at our future-ready Fibre to the Home services & get ready to do more!
Check Pricing & Availability in Your Area (Residential): Phone | TV | Internet
Check Pricing & Availability in Your Area (Business): Phone | TV | Internet
Commitment
We ask that you commit to one, two, or all three of our fibre services for three years. In return, your price is guaranteed not to increase for three years and Wightman will install your fibre and equipment at no cost to you.
Wightman TV services available for Visually Impaired Customers
Wightman makes it easier for Visually Impaired customers with a few different options.
• Offering Described Video Service (DVS) programming.
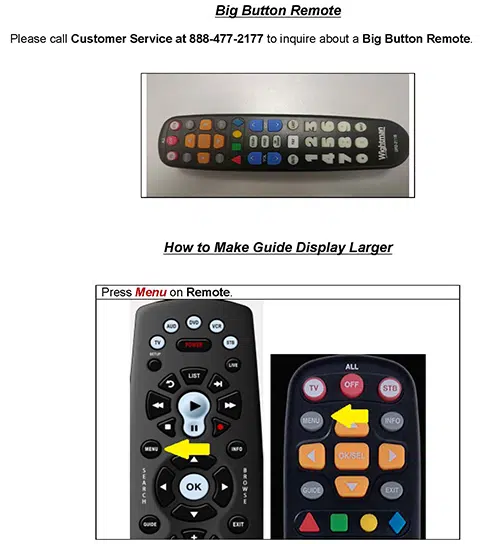
• Offering Big Button Remotes.
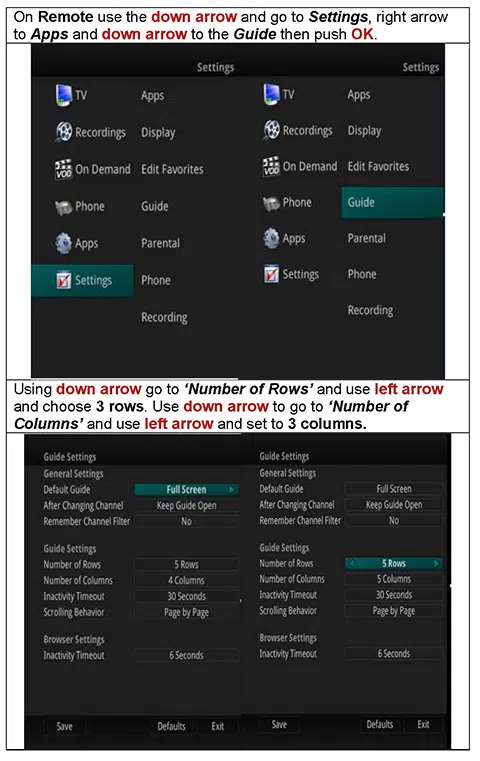
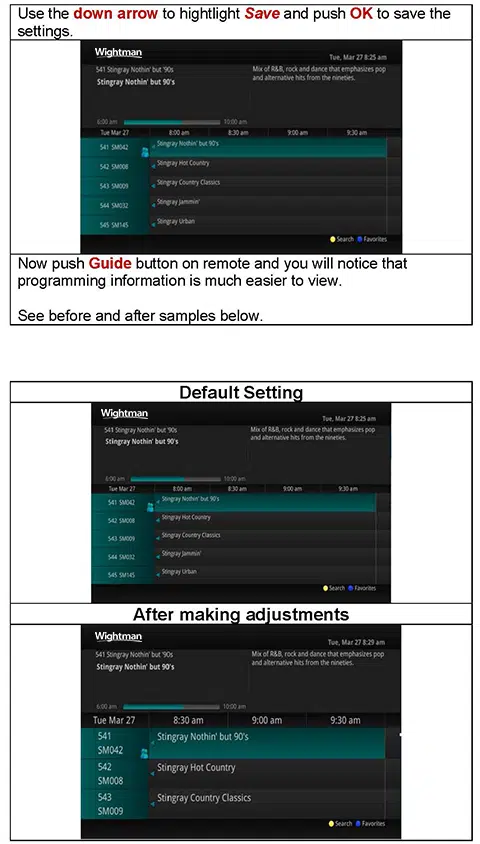
• Adjusting Guide display format making it easier to see programming information.
Described Video Service (DVS)
Wightman offers access to Described Video Service (DVS) programming, where it is available from the broadcaster. Described Video is the narrated description of a program’s non-verbal elements that may include surroundings, costumes, and body language. The description is added during pauses in dialogue and enables people to form a mental picture of what is happening in the program.
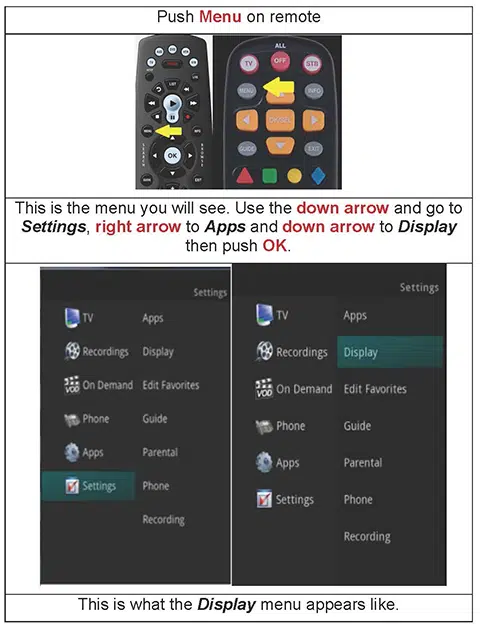
See instructions below for enabling Described Video on the Potenza & Big Button Remotes:
The What’s Hot application allows you to view local area real time information about what others in your local area are watching. The end user can easily tune to one of the “What’s Hot” programs or set a recording.
- Select the MENU button on your remote control. Select Apps, highlight What’s Hot, and select the OK button.
- A window will appear on the screen with the most current popular channel information for the local area. The popular channel information may be viewed in multiple categories by pressing the Right or Left Arrow buttons. Additional popular channel information may be viewed by scrolling down by pressing the Up or Down Arrow buttons.

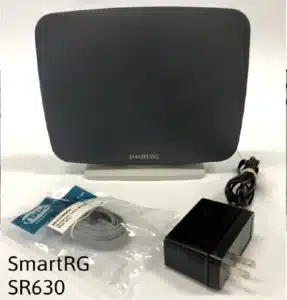
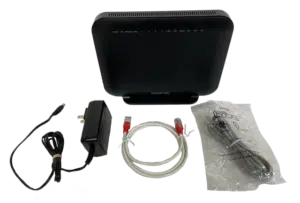
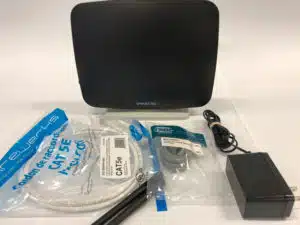
Remove your SmartRG SR630 from the box. You should have:
- Router
- Power Adapter
- Ethernet Cable
- DSL Cable
Connecting the Cables:
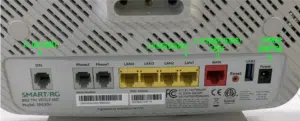
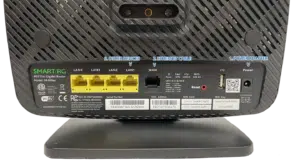
- Plug the power adapter into the back of the SmartRG and also into an electrical outlet. Ensure the on/off button on the side of the SmartRG is pushed in. You should see a Power light.
- If you are on FIBRE – Plug the white Ethernet cable into the port on the SmartRG router labelled WAN. The other end of this cable should go to an Ethernet jack in the wall or directly to ETH 1 on the Fibre Optic modem. The WAN light should go solid within a few minutes.
2.1.If you are on DSL – Plug the DSL (phone) cable into the port on the SmartRG labelled DSL. The other end of this cable should go to a phone jack in the wall. The DSL light should go solid within a few minutes. - Wired devices can be connected using an additional Ethernet cable (not included) plugged in to any one of the yellow LAN ports on the SmartRG.
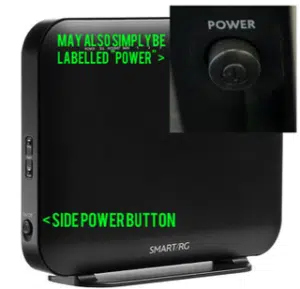
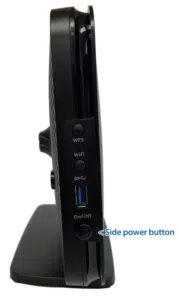
* The SmartRG On/Off – Power Button
Located on the side of the SmartRG. The power light is on the top of the modem.
Remove your SmartRG SR616 from the box. You should have:
- Router
- Power Adapter
- Ethernet Cable
- DSL Cable
Connecting the Cables:
1. Plug the power adapter into the back of the Smart RG and also into an electrical outlet. Ensure the on/off button* on the side of the Smart RG is pushed in. You should see a Power light.
2. If you are on FIBER – Plug the white Ethernet cable into the port on the Smart RG router labelled WAN. The other end of this cable should go to an Ethernet jack in the wall or directly to ETH 1 on the Fibre Optic modem. The WAN light should go solid within a few minutes.
2.1 If you are on DSL – Plug the DSL (phone) cable into the port on the SmartRG labelled DSL. The other end of this cable should go to a phone jack in the wall. The DSL light should go solid within a few minutes.
3. Wired devices can be connected using an additional Ethernet cable (not included) plugged in to any one of the yellow LAN ports on the Smart RG unless the Smart RG is also being used for TV services.
If TV service is also configured on this router, use LAN Port 1 only for devices.

* The Smart RG On/Off – Power Button
Usually located on the side of the SmartRG, although on some models, it is located on the back, to the right of the power adapter cord input.
Remove your SmartRG SR515 from the box. You should have:
- Router
- Power Adapter
- Ethernet Cable
- DSL Cable

Connecting the Cables:
1. Plug the power adapter into the back of the SmartRG and also into an electrical outlet. Ensure the on/off button on the side of the SmartRG is pushed in. You should see a Power light.
2. If you are on FIBER – Plug the white Ethernet cable into the port on the SmartRG router labelled WAN. The other end of this cable should go to an Ethernet jack in the wall or directly to ETH 1 on the Fibre Optic modem. The WAN light should go solid within a few minutes.
2.1 If you are on DSL – Plug the DSL (phone) cable into the port on the SmartRG labelled DSL. The other end of this cable should go to a phone jack in the wall. The DSL light should go solid within a few minutes.
3. Wired devices can be connected using an additional Ethernet cable (not included) plugged in to any one of the yellow LAN ports on the SmartRG unless the SmartRG is also being used for TV services.
If TV service is also configured on this router, use LAN Port 1 only for devices.

* The SmartRG On/Off – Power Button
Located on the side of the SmartRG. The power light is on the top of the modem.
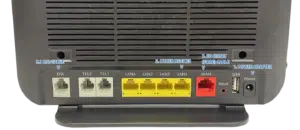
Remove your SmartRG SR510 from the box. You should have:
- Router
- Power Adapter
- Ethernet Cable (Fiber)
- DSL Cable
- Antennas x2
Connecting the Cables and Antennas:

- Screw the antennas onto the threaded metal posts
- Plug the power adapter into the back of the SmartRG router and also into an electrical outlet. Ensure the on/off button on the rear of the SmartRG router is pushed in. You should see a Power light.
- If you are on FIBRE – Plug the white Ethernet cable into the port on the SmartRG router labelled WAN. The WAN light should go solid within a few minutes.
If you are on DSL – Plug the DSL (phone) cable into the port on the SmartRG labelled DSL. The DSL light should go solid within a few minutes. - Wired devices can be connected using an additional Ethernet cable (not included) plugged in to any one of the yellow LAN ports on the SmartRG router unless the SmartRG router is also being used for TV services.
If TV service is also configured on this router, use LAN Port 1 only for devices.

* The SmartRG On/Off – Power Button
Located on the side of the SmartRG. The power light is on the top of the modem.
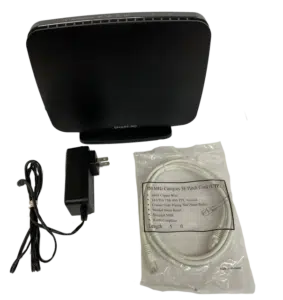
Remove your SmartRG SR400 from the box. You should have:
• Router
• Power Adapter
• Ethernet Cable
Connecting the Cables
1. Plug the power adapter into the back of the SmartRG router and also into an electrical outlet. Ensure the on/off button on the side of the SmartRG router is pushed in. You should see a Power light.
2. Plug the white Ethernet cable into the port on the SmartRG router labelled WAN. The other end of this cable should go to an ethernet jack in the wall or directly to ETH 1 on the Fibre Optic modem. Typically, this modem will be mounted on a wall. The WAN light should go solid within a few minutes.
3. Wired devices can be connected using an additional Ethernet cable (not included) plugged in to any one of the yellow LAN ports on the SmartRG router unless the SmartRG router is also being used for TV services.
If TV service is also configured on this router, use LAN Port 1 only for devices.
* The SmartRG On/Off – Power Button
Located on the side of the SmartRG. The power light is on the top of the modem.