- Please ensure there is a light on the front of the STB.
Please Note: The colour of the light will vary depending on the STB you have. It will be either red, green, or blue. - Check the cables on the back of the STB and the back of the TV to ensure they are secure.
- Check to see if the STB runs through any other hardware such as a DVD or VCR. If so, ensure this is turned on.
- Bypass any extra devices such as your DVD player or VCR and connect the STB directly to the TV.
- Remove the power cord from the back of the STB for 5 seconds.
Please Note: The power cord is a thin black cable. The light on the STB will go off once the power is removed. - Please ensure your TV is set to input that corresponds with the STB connection. Press the Input button on your remote control to change the TV input.
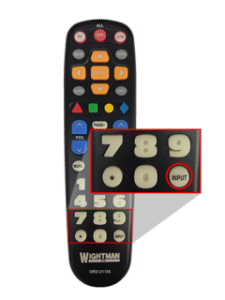
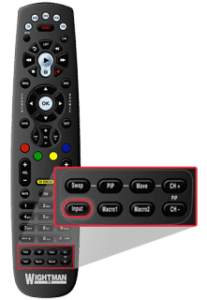
- Please note: If using the black Wightman remote, the Input button will be at the very bottom on the left hand side of the remote.
- Please note: If using the “big button” Wightman remote, the Input button will be to the right of the zero (0) at the bottom of the remote.
- If you are unable to change the input using your Wightman remote control please try using either your TV remote or the buttons on the TV.
Please Note: The button on the TV remote my say Input, Source, or TV/Video. - If your TV is still displaying a No Signal message and you are able to try another video connection please do so and adjust the setting on the TV accordingly.
- If there is still a “No Signal” message on your TV, please call our 24 hour Technical Support Team at 1.888.477.2177 to schedule a technician visit.
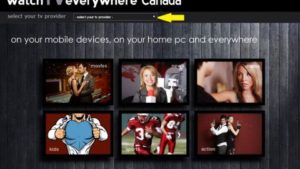
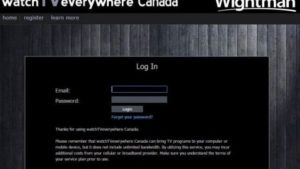
- Go to Watch TV Everywhere website
Click on the drop down menu and select Wightman Telecom.
- After selecting Wightman Telecom as your provider, you will need to click on Register. If you have already registered, click Log In.

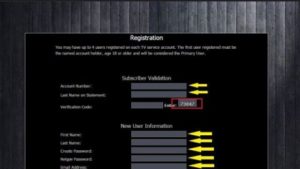
- After clicking Register, you will be taken to the Registration screen. You will have to fill in all the blanks. You will need your 8 Digit Account number which is found on your bill/statement. When all the blanks are filled in, click Register, at the bottom.*Please note the Verification Code is the number that appears after the word Enter. (Outlined in red in the picture).
- Once you have filled in the information and clicked the Register button, you will receive a notification that an email has been sent to the address provided. Open your email and click on the link within to complete the registration process.
- Once you have completed the registration process by clicking the link in your email, you will be taken to the login page. Here you will enter the email and the password that you created during registration. Note: You may want to add this site to your Bookmarks/Favourites, for easier access in the future.
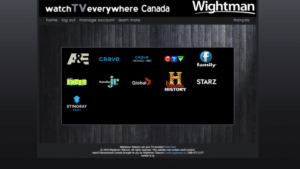
- After Logging in you will see the channels that are available to you based on the TV packages you are subscribed to with Wightman.
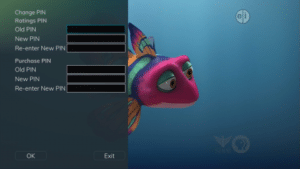
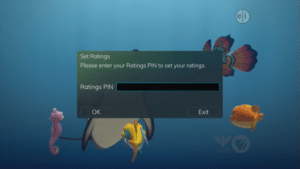
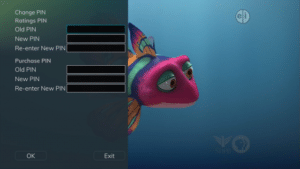
The VOD Purchase PIN and the Parental Control Ratings PIN are the same. Until you change it, the PIN is 0000.
To change your Purchase/Ratings PIN:
- Select the MENU button on your remote control. Within the Parental menu, arrow to the right and select the Change PIN category (For the Ratings PIN or Purchase PIN).
- Use the arrow button to highlight change PIN and press the OK button.
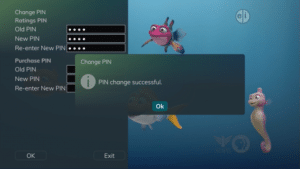
- Enter the Old PIN, arrow down and enter your New PIN. Then arrow down to confirm the New PIN. Select OK to save your new PIN. Until you change it, the default PIN is 0000.
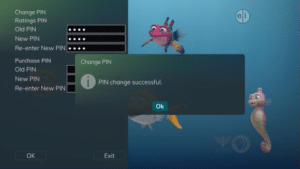
- Once the PIN has been successfully changed, a prompt will appear. Press the OK button.
Quick Answer
To access the VOD menu, select the ON DEMAND button on your remote control.
Full Answer
The Movies/Video On Demand feature provided by the service allows you to choose from a listing of popular movies/events within the Movies Library. Once chosen, these purchased movies will be added to your Rental library and will be available for viewing for the allocated amount of time.
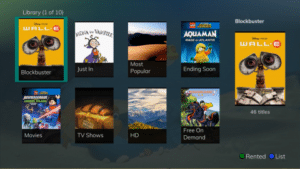
Purchase a New Video On Demand Event
- In order to purchase a new event, select the Video On Demand button on your remote control. The Library Main Screen will appear. Select the library that you would like to choose from including Blockbuster, Just In, Most Popular, Ending Soon, Movies, TV Shows, HD, and Free On Demand.
- Once in the desired library, select the event that you would like to purchase.
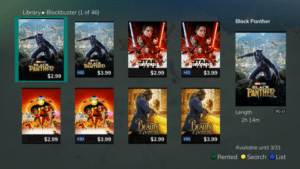
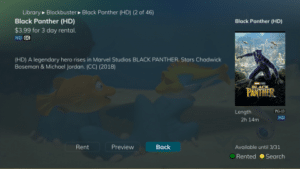
- The library description for the selected event will appear. The movie title, price, rental period, event description, rating, and event length will be shown. In order to preview a trailer for the event, select the Preview button. In order to purchase the event, select the Rent button.
- A Purchase Information Screen will appear containing the event’s title and price. The purchase screen will allow you to share the event with the rest of your whole home group before asking for your Purchase Pin. Enter your Purchase Pin and select the Rent button.
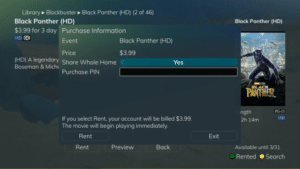
- Your purchased event should begin playing immediately. Press the Exit button on your remote control to return to your previously-viewed channel.
View Current Video On Demand Rentals
To view your current Video On Demand rentals that are available for viewing, select the Video On Demand button. Select the Green button on your remote. The Rentals screen will appear and will show all of your current event rentals, the price of the events, whole home sharing availability for each event, and the date each rental will expire. To watch the selected event, press the OK button on your remote control.
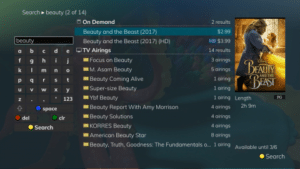
Search Video On Demand Rentals
- To search for a specific Video On Demand title, select the Yellow button on your remote. A Search Library screen will appear. Enter a keyword or title into the search field and select the Yellow button again.
- Search results for the entered title/keyword will appear. Results will include On Demand programming as well as TV Airings.
- Within the Parental menu, arrow to the right and select the Set Ratings category. The Set Ratings category allows you to set access to programming based on TV and Movie ratings. This will require that a PIN be entered in order to view programming at or beyond the rating you specify.
- Use the Left/Right arrow buttons to choose a TV Rating. Options are TV-Y, TVY7, TV-Y7 FV, TV-G, TV-PG, TV-14, TV-MA, off.
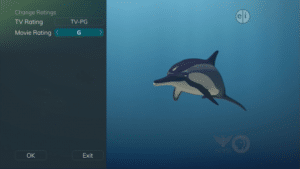
- Use the Left/Right arrow buttons to choose a Movie Rating. Options are G, PG, PG-13, R, NC-17, Adults Only, off.
- Within the Parental Menu, arrow to the right and select the Edit Locked category. The Edit Locked category allows you to lock specific channels. This will require you to enter a PIN in order to view programming on that channel.
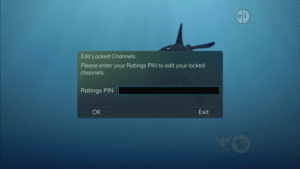
- A list of channels will display. Use the Up/Down arrow buttons to move through the list of channels. When you arrive at one that you want to lock, press the OK button, and the channel will be added to the locked list.
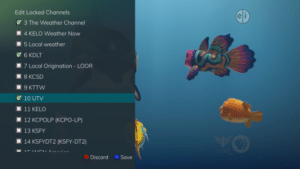
- When you are finished making your selections, press the Blue button on the remote to lock the selected channels. Press the Red button on the remote to discard the changes and return to normal viewing.
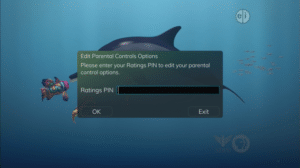
- Within the Parental menu, arrow to the right and select the Options category. The Options category requires the Ratings PIN to be entered in order to update any settings. Enter your PIN, and select OK, and press the OK button.
- Once the Ratings PIN has been entered, you may choose to have Locked Channels and/or Show Restricted Titles visible. Selecting a “No” value for either setting will cause these programs to not appear in the Guide. Select OK within the prompt and press the OK button.
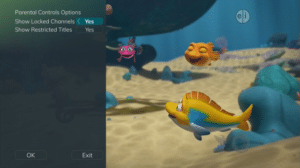
- A Parental Controls Options prompt will appear once the changes have been saved successfully.
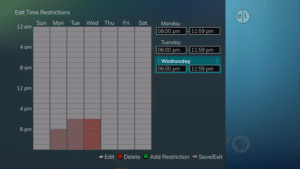
- Edit Time Restrictions prompt. Within the Parental menu, arrow to the right and select the Time Restrictions category. The Time Restrictions category allows you to set time periods per day where television access requires a PIN. These time restrictions may be set by selecting the Green button to Add Restriction. A new restriction will appear to the right of the week schedule. Arrow to the right to select a day and press the OK button.

- Once a day has been selected, use the Up/Down arrows to select a time and either AM or PM for both start and end time for the time restriction. When you are done creating time restrictions, select the EXIT button.
- Within the Parental menu, arrow to the right and select the Change PIN category
for the Ratings PIN or Purchase PIN. - Use the arrow button to highlight change PIN and press the OK button.
- Enter the Old PIN, arrow down and enter your New PIN. Then arrow down to confirm the New PIN. Select OK to save your new PIN. Until you change it, the default PIN is 0000.
- Once the PIN has been successfully changed, a prompt will appear. Press the OK button.
Within the Parental menu, arrow to the right and select the Cancel Override category. The Cancel Override category allows any previous PIN overrides for an extended period of time to be cancelled. To cancel an existing override, select OK
within the Cancel Override prompt. Once the override has been cancelled, the parental PIN will need to be used for all Locked and Rated channels.