Quick Reference Guide – Nokia Beacon 3.1
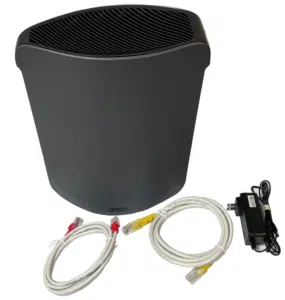
Remove your Adtran 834-6 Dual Band Router from the box. You should have:
- Router
- Power Adapter
- Ethernet Cables
Connecting the Cables:
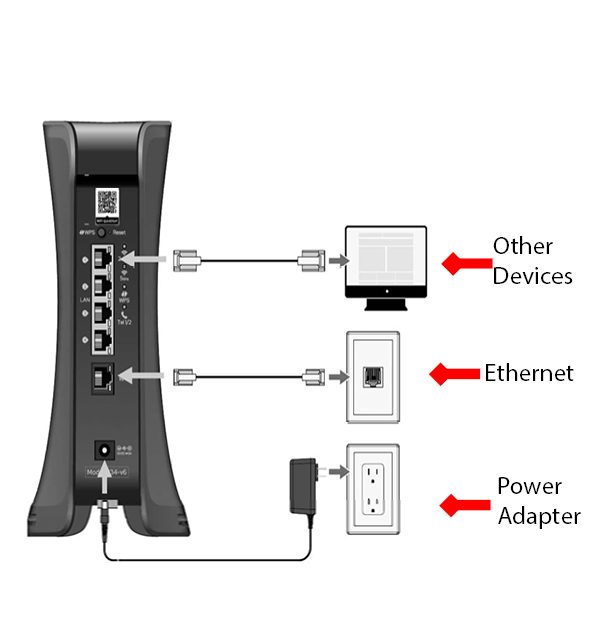
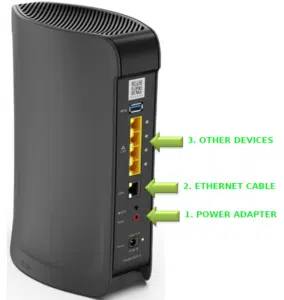
- Plug the power adapter into the back of the Adtran router and also into an electrical outlet. You should see a Power light.
- Plug the white/red Ethernet cable into the port on the Adtran router labelled WAN. The other end of this cable should go to an ethernet jack in the wall or directly to ETH 1 on the Fibre Optic modem. Typically, this modem will be mounted on a wall.
- Wired devices can be connected using an additional Ethernet cable plugged in to any one of the yellow LAN ports on the Adtran router unless the Adtran router is also being used for TV services.
If TV service is also configured on this router, use LAN Port 1 only for devices.
eero Secure gives you enhanced privacy controls for your Wightman supplied eero network – set content limits, time of day access and much more. This will require an enabled and set up eero network with access to the created account on your eero app installed on a mobile device. Please ensure you have both of these before you begin.
How to set up your eero mobile app allows you full control over your Wightman supplied eero network. This will require a phone or other mobile device with data enabled, and the eero app installed on this device. Please ensure you have both of these before you begin.
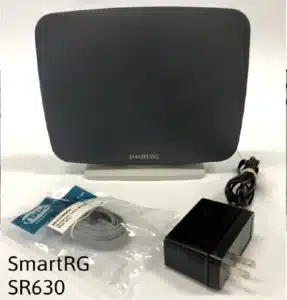
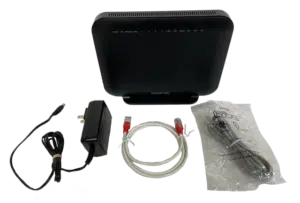
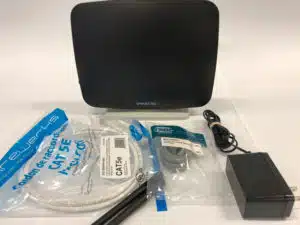
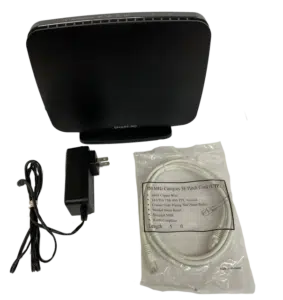
Remove your SmartRG SR630 from the box. You should have:
- Router
- Power Adapter
- Ethernet Cable
- DSL Cable
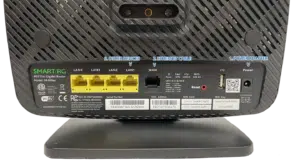
Connecting the Cables:
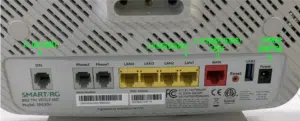
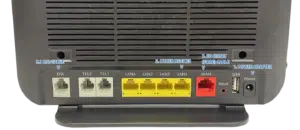
- Plug the power adapter into the back of the SmartRG and also into an electrical outlet. Ensure the on/off button on the side of the SmartRG is pushed in. You should see a Power light.
- If you are on FIBRE – Plug the white Ethernet cable into the port on the SmartRG router labelled WAN. The other end of this cable should go to an Ethernet jack in the wall or directly to ETH 1 on the Fibre Optic modem. The WAN light should go solid within a few minutes.
2.1.If you are on DSL – Plug the DSL (phone) cable into the port on the SmartRG labelled DSL. The other end of this cable should go to a phone jack in the wall. The DSL light should go solid within a few minutes.
- Wired devices can be connected using an additional Ethernet cable (not included) plugged in to any one of the yellow LAN ports on the SmartRG.
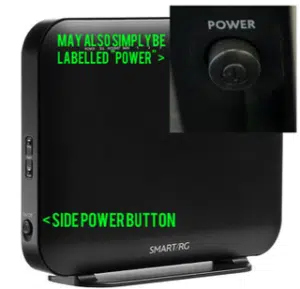
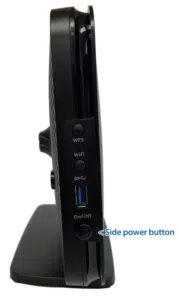
* The SmartRG On/Off – Power Button
Located on the side of the SmartRG. The power light is on the top of the modem.
Remove your SmartRG SR616 from the box. You should have:
- Router
- Power Adapter
- Ethernet Cable
- DSL Cable
Connecting the Cables:
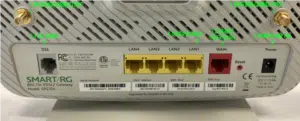
1. Plug the power adapter into the back of the Smart RG and also into an electrical outlet. Ensure the on/off button* on the side of the Smart RG is pushed in. You should see a Power light.
2. If you are on FIBER – Plug the white Ethernet cable into the port on the Smart RG router labelled WAN. The other end of this cable should go to an Ethernet jack in the wall or directly to ETH 1 on the Fibre Optic modem. The WAN light should go solid within a few minutes.
2.1 If you are on DSL – Plug the DSL (phone) cable into the port on the SmartRG labelled DSL. The other end of this cable should go to a phone jack in the wall. The DSL light should go solid within a few minutes.
3. Wired devices can be connected using an additional Ethernet cable (not included) plugged in to any one of the yellow LAN ports on the Smart RG unless the Smart RG is also being used for TV services.
If TV service is also configured on this router, use LAN Port 1 only for devices.

* The Smart RG On/Off – Power Button
Usually located on the side of the SmartRG, although on some models, it is located on the back, to the right of the power adapter cord input.
Remove your SmartRG SR515 from the box. You should have:
- Router
- Power Adapter
- Ethernet Cable
- DSL Cable

Connecting the Cables:
1. Plug the power adapter into the back of the SmartRG and also into an electrical outlet. Ensure the on/off button on the side of the SmartRG is pushed in. You should see a Power light.
2. If you are on FIBER – Plug the white Ethernet cable into the port on the SmartRG router labelled WAN. The other end of this cable should go to an Ethernet jack in the wall or directly to ETH 1 on the Fibre Optic modem. The WAN light should go solid within a few minutes.
2.1 If you are on DSL – Plug the DSL (phone) cable into the port on the SmartRG labelled DSL. The other end of this cable should go to a phone jack in the wall. The DSL light should go solid within a few minutes.
3. Wired devices can be connected using an additional Ethernet cable (not included) plugged in to any one of the yellow LAN ports on the SmartRG unless the SmartRG is also being used for TV services.
If TV service is also configured on this router, use LAN Port 1 only for devices.

* The SmartRG On/Off – Power Button
Located on the side of the SmartRG. The power light is on the top of the modem.
Remove your SmartRG SR510 from the box. You should have:
- Router
- Power Adapter
- Ethernet Cable (Fiber)
- DSL Cable
- Antennas x2
Connecting the Cables and Antennas:

- Screw the antennas onto the threaded metal posts
- Plug the power adapter into the back of the SmartRG router and also into an electrical outlet. Ensure the on/off button on the rear of the SmartRG router is pushed in. You should see a Power light.
- If you are on FIBRE – Plug the white Ethernet cable into the port on the SmartRG router labelled WAN. The WAN light should go solid within a few minutes.
If you are on DSL – Plug the DSL (phone) cable into the port on the SmartRG labelled DSL. The DSL light should go solid within a few minutes.
- Wired devices can be connected using an additional Ethernet cable (not included) plugged in to any one of the yellow LAN ports on the SmartRG router unless the SmartRG router is also being used for TV services.
If TV service is also configured on this router, use LAN Port 1 only for devices.

* The SmartRG On/Off – Power Button
Located on the side of the SmartRG. The power light is on the top of the modem.
Remove your SmartRG SR400 from the box. You should have:
• Router
• Power Adapter
• Ethernet Cable
Connecting the Cables
1. Plug the power adapter into the back of the SmartRG router and also into an electrical outlet. Ensure the on/off button on the side of the SmartRG router is pushed in. You should see a Power light.
2. Plug the white Ethernet cable into the port on the SmartRG router labelled WAN. The other end of this cable should go to an ethernet jack in the wall or directly to ETH 1 on the Fibre Optic modem. Typically, this modem will be mounted on a wall. The WAN light should go solid within a few minutes.
3. Wired devices can be connected using an additional Ethernet cable (not included) plugged in to any one of the yellow LAN ports on the SmartRG router unless the SmartRG router is also being used for TV services.
If TV service is also configured on this router, use LAN Port 1 only for devices.
* The SmartRG On/Off – Power Button
Located on the side of the SmartRG. The power light is on the top of the modem.
Remove your Adtran 834-5 Dual Band Router from the box. You should have:
- Router
- Power Adapter
- Ethernet Cables
Connecting the Cables:
- Plug the power adapter into the back of the Adtran router and also into an electrical outlet. You should see a Power light.
- Plug the white/red Ethernet cable into the port on the Adtran router labelled WAN. The other end of this cable should go to an ethernet jack in the wall or directly to ETH 1 on the Fibre Optic modem. Typically, this modem will be mounted on a wall.
- Wired devices can be connected using an additional Ethernet cable plugged in to any one of the yellow LAN ports on the Adtran router unless the Adtran router is also being used for TV services.
If TV service is also configured on this router, use LAN Port 1 only for devices.