Is there anything that can help extend my Wi-Fi signal?
- You could get a Wi-Fi extender. This allows you to help extend the Wi-Fi signal to places that you have an issue getting Wi-Fi to in your home.
Learn more about how you can boost your wifi signal here.
- The first step would be to power cycle your router by unplugging it from the power for 30 seconds then plugging it back in.
- The second step would be to adjust your antennas. Do this by moving one of the antennas in a 90 degree angle. By ensuring the antennas are not parallel to each other may be the solution to reaching the problem area. This step however can be skipped if you have a router with built in antennas.
Learn more about how you can boost your wifi signal here.
Why can’t I see my 5G Wi-Fi network on some devices but can on others?
- Some devices, especially older ones are not compatible with the 5G Wi-Fi network so they will not be able to see the 5G Wi-Fi network.
This depends on what you do on the internet and the size of the files you are downloading or uploading. 250 GB would equate to approximately, 64,000 songs per month, 300 standard definition movies per month or 80 high definition movies per month.
Several factors can affect the speed of your service. For example, you should be aware that the speed of your connection gets distributed among all the devices in your home (computers, smart TVs, phones, tablets, game consoles, etc.). Also, your speed varies depending on the capacity of each device.
The type and age of your devices can slow down the speed of your connection, and so can the number of applications running (the more apps you’re running, the more speed you lose). Also, the number of things you’re doing online at once can affect your speed.
To maximize your Internet speed, start by connecting your computer (or other device) directly to your modem or router using an Ethernet cable. Plus, you should verify that:
- The devices you’re using don’t have any performance issues
- If you’re sharing your connection with others, verify that your connection is not overloaded. Try making a schedule for when people can do heavier-use activities online.
- Your firewall software is properly configured (if it isn’t, it can cause a slowdown)
- Your modem or router has no signal problems
- Your browser’s cache has recently been cleared
- Your operating system has recently been updated
Check Your Router Settings:
As the centre piece of a network, a router can be responsible for slow internet connections if it is configured improperly. Ensure your router’s settings are all consistent with the manufacturer’s documentation and your Internet Service Provider’s recommendations. Carefully record any changes you make to your router’s configuration so that you can undo them later if necessary.
Avoid Wireless Signal Interference:
Wi-Fi and other types of wireless connections often perform poorly due to signal interference, which requires computers to continually resend messages to overcome signal issues. Household appliances and even your neighbours’ wireless networks can interfere with your computers. To avoid slow internet connections due to signal interference, reposition your router to a more central location for better performance. In general, the closer your device is to the router, the better the Wi-Fi connection.
Make sure your router and other network equipment is working:
When routers, modems, or cables malfunction, they don’t properly support network traffic at full speeds. Certain technical glitches in network equipment negatively affect performance even though connections themselves can still be made. To troubleshoot potentially faulty equipment, temporarily rearrange and reconfigure your gear while experimenting with different configurations. Systematically try bypassing the router, swapping cables, and testing with multiple devices to isolate the slow performance to a specific component of the system. Then, decide if it can be upgraded, repaired, or replaced.
Stop background programs that hog bandwidth:
Some software applications on a computer run background processes that are hidden behind other apps or minimized to the system tray, where they are quietly consuming network resources. These applications are designed to do useful work and are not the kind that a person wants to remove from a device normally. Games and programs that work with videos can heavily impact your network and cause connections to appear slow. It’s easy to forget these applications are running. Check your computers for any programs that are running in the background when you troubleshoot a slow network.
Call Wightman, your Internet Service Provider (ISP):
Internet speed ultimately depends on the service provider. Your ISP may change its network configuration or suffer technical difficulties that inadvertently cause your internet connection to run slowly. Don’t hesitate to contact Wightman Tech Support at 1-888-477-2177 if you suspect it is responsible for your slow internet connection.
If you like to be able to surf within only a specific set of channels, you can create Favourites lists. By default, your set top box has grouped channels into several pre-set Favorites lists including:
All Channels, Subscribed Channels, Movie Channels, Sports Channels, Music Channels, Entertainment Channels, Kids Channels, News Channels, Business News Channels, Infotainment
Channels, Religious Channels, Regional Channels, and HD Channels. You may create up to five additional Favourites lists.
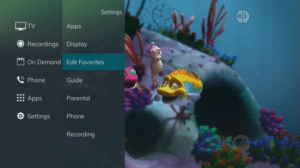
- Press the MENU button to access the Main Menu. Highlight Settings. Use the arrow buttons to highlight Edit Favourites, and then press the OK button.
- If you are not already in a ‘New List’ by default, arrow right to access a New List.
- All available channels will display. Use the Up/Down arrow buttons on the remote control to move through the list of channels. When you are on a channel you want to add to your list, press the OK button to mark it as part of this favourites list.
- To name the list, press the Yellow button on the remote control.
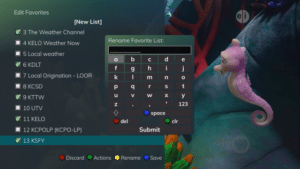
- Use the arrow buttons to move through the letters on the screen. Press the OK button on the remote control to choose a letter. When you have named your list, arrow down to select the Submit to accept your name.
- To Save your favourites list, press the Blue button on the remote control and then press the OK button.
- To Discard a favourites list, press the Red button on the remote control.
- Press the EXIT button on the remote control to leave the menu.
Favourite List Actions
To view the available Actions associated with each Favorites List, press the Green button on the remote control. The Actions list displays on the right side of the screen. To make it easy for you, the list of Actions on the screen shows the corresponding button that you could press on the remote control. You can also highlight your selection and then press the OK button on the remote control.
- Selecting the Discard Changes option will exit Edit Favorites without making any changes.
- Rename List allows you to change the name of this list without changing the channels that were previously selected for this list.
- Save List will save any changes made to this Favorites List.
- Delete List will delete this list from your Favorites.
- Invert List lets you select or deselect channels in this Favorites List. For example, if you have selected 10 channels in this Favorites List and click OK on Invert List, those 10 channels will be deselected and all of your other subscribed channels will be selected. If you click OK again those 10 previously selected channels will be back in the list while the rest of the subscribed channels will be removed.

Access a Favourites List for Surfing
- Press the FAV button on the remote control.
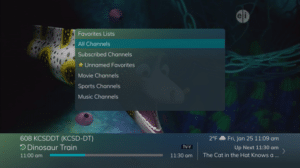
- All Favourites lists will display. Lists that you have created will display with a star.
- Arrow down to highlight the Favourites list you want to use and then press the OK button on the remote control. The list you have selected will show just above the channel number.
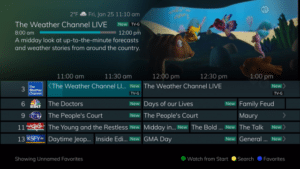
- With the favourites list selected, you will browse channels only within that list.
My Screen is blank, or display “No Signal” or a similar Message.
The signal input to your TV may have been changed. To change the source input on your TV:
- Press the INPUT button on your remote.
- Press INPUT repeatedly until the desired source is selected.
1. What channels do we offer
- Sportsnet One 4K on channel 471
- Sportsnet 4K on channel 472
2. A customer will have to have the following to be able to play 4K content:
- Be on a fibre fed service. This includes Customers in MDU’s that are fed by fibre and service is over in-building copper.
- An Amulet 6 DVR STB attached to the 4K TV
- A 4K compliant TV
- Subscribe to a package that has 4K content – this is packages with Sportsnet One and Sportsnet Ontario
- What happens if you tune to a 4K channel or recording from a non 4K TV?
- If the output resolution for the Amulet 6 is set to match the non 4K resolution of the TV (i.e. 1080P), the 4K channel will be scaled down to the current resolution of the TV.
3. What happens if you tune to 4K on a TV connected to a non 4K STB?
- The Set top box will display a black screen. Audio will still function.
4. What happens if the Amulet 6 is connected to the TV using Composite cables, and watching 4k?
- The Amulet 6 will reformat the video to fit the display, in a 4:3 aspect ratio everything will be “squeezed” to fit this ratio
5. What if I want 4K channels and have your fibre service, a 4K TV and subscribe to SN.
- Great, to enable 4K, you need an Entone Amulet 6 DVR Set Top Box. There is a self install upgrade charge of $75 for the new device or if you want us to come out and install it, the total charge is $100. The 4K STB is $16.95 per month rental.
6. I have all the above and I have an Amulet 6 DVR STB. Are there any incremental charges?
- You are good to go and there are no incremental charges.
7. Is all content on the 4K channels filmed in 4K?
- Not necessarily. On the SportsNet channels, Rogers does not record or broadcast all of the NHL and NBA games in 4K. They typically publish a list of the games in 4K. Even if a game is not recorded in 4K but is scheduled on the channel guide, it will play. See the NBA and NHL 4K schedules above for examples.
8. How can we see what games are broadcast in 4K?
- Sportsnet provides a view of 4K games on their website. The screenshot below shows how they indicate if it is a 4K broadcast. This is available at: sportsnet.ca/schedule
Quick Answer
To access the VOD menu, select the ON DEMAND button on your remote control.
Full Answer
The Movies/Video On Demand feature provided by the service allows you to choose from a listing of popular movies/events within the Movies Library. Once chosen, these purchased movies will be added to your Rental library and will be available for viewing for the allocated amount of time.
Purchase a New Video On Demand Event
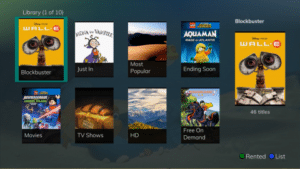
- In order to purchase a new event, select the Video On Demand button on your remote control. The Library Main Screen will appear. Select the library that you would like to choose from including Blockbuster, Just In, Most Popular, Ending Soon, Movies, TV Shows, HD, and Free On Demand.
- Once in the desired library, select the event that you would like to purchase.
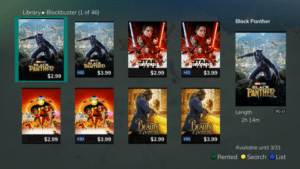
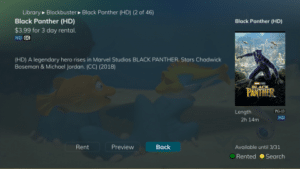
- The library description for the selected event will appear. The movie title, price, rental period, event description, rating, and event length will be shown. In order to preview a trailer for the event, select the Preview button. In order to purchase the event, select the Rent button.
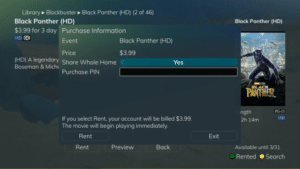
- A Purchase Information Screen will appear containing the event’s title and price. The purchase screen will allow you to share the event with the rest of your whole home group before asking for your Purchase Pin. Enter your Purchase Pin and select the Rent button.
- Your purchased event should begin playing immediately. Press the Exit button on your remote control to return to your previously-viewed channel.
View Current Video On Demand Rentals
To view your current Video On Demand rentals that are available for viewing, select the Video On Demand button. Select the Green button on your remote. The Rentals screen will appear and will show all of your current event rentals, the price of the events, whole home sharing availability for each event, and the date each rental will expire. To watch the selected event, press the OK button on your remote control.
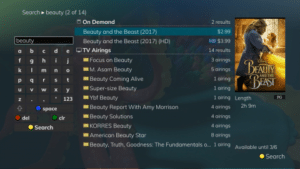
Search Video On Demand Rentals
- To search for a specific Video On Demand title, select the Yellow button on your remote. A Search Library screen will appear. Enter a keyword or title into the search field and select the Yellow button again.
- Search results for the entered title/keyword will appear. Results will include On Demand programming as well as TV Airings.
If you cannot send text messages please follow steps below for both Android devices and iPhones.
- Verify voice calls can be made.
- Send yourself a text message. Make sure you enter the full 10-digit phone number.
- Have someone else send you a text message.
- Reboot the phone
If these steps fail, then confirm that the Message Centre number is entered correctly.
The message centre ensures that your text message is sent to the recipient. If the wrong message centre number is saved in your phone, the text message can’t be sent.
To verify Message Centre number, follow the instructions below for your type of device, Android or iPhone.
Android
- Pull the menu down from the top of your screen.
- Tap on settings.

- Tap on the magnifying glass.
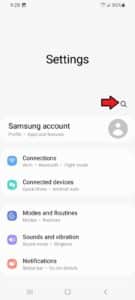
- Search for Message Centre.

- Verify that the Message Centre number is 15195180009

iPhone
- Open the dialer keypad on your device and enter the following code *#5005*7672# then press the call button.
- The current Message Centre number is shown on the screen. If correct tap Dismiss.
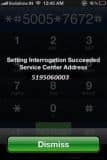
- If the message centre number needs changing, enter *#5005*7672#15195180009# and tap Call. The message “Setting succeeded, Service Centre Address, No Address” will appear on screen. Tap Dismiss.
If text messages are still not sending, call Wightman Technical Support at 1.888.477.2177, to ensure you have text messaging enabled.
If all above troubleshooting fails, you made need to reset your phone to factory settings. Please ensure you have backed up your personal information.